

This is another successful experiment with the breadmaker. I had leftover Greek yogurt and red bean paste in the fridge. So I adapted Carol's yogurt bread recipe and used my method in this experiment to make a Danish yogurt loaf wrapped with red bean paste. Love the result as the bread is so soft and tasty.
今天取自胡涓涓的‘忧格面包’食谱,采用自己的做法,做了这个面包机试验。冰箱除了有剩余的酸奶还有红豆沙馅,就做了这丹麦酸奶红豆沙面包。把红豆沙包入面团中,用面包机烤,省了开动烤炉。烤出来的面包是如此的松软可口。 以前常听别人说面包机烤的面包又硬又不好吃,所以犹豫了些时候,才把它败回了。有了它就开始做试验,尝试了不同做法。除了吐司也做了小面包,成功做了多种美味又安心的面包机面包。(按这就可看到我分享的面包机试验和食谱)你也一起来体验这种乐趣吧!
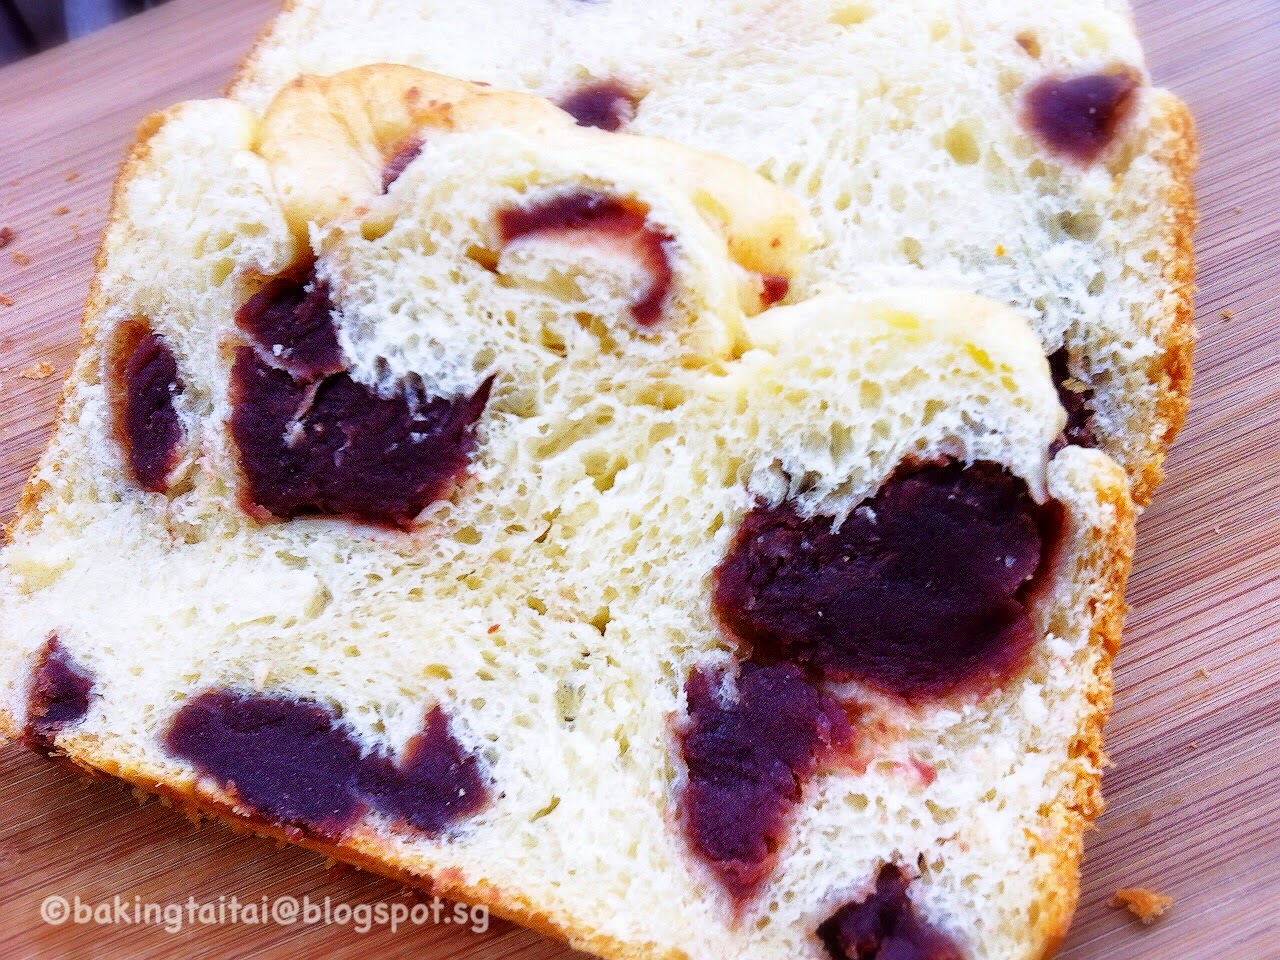 |
| Love the softness of the bread and taste of the red bean paste |
Danish Yogurt Breadmaker Loaf With Red Bean Paste
丹麦酸奶红豆沙面包机面包
Ingredients:
200g Greek yogurt (can replaced with plain yogurt)
1 Egg
270g Bread flour
30g Cake Flour
20g Organic raw sugar (can replaced with castor or fine sugar)
1/8 tsp Salt
1/2 tsp Instant dry yeast
30g Olive Oil
350g Red bean paste (bought from Kwong Cheong Thye)
1 Egg
270g Bread flour
30g Cake Flour
20g Organic raw sugar (can replaced with castor or fine sugar)
1/8 tsp Salt
1/2 tsp Instant dry yeast
30g Olive Oil
350g Red bean paste (bought from Kwong Cheong Thye)
材料:
200克 希腊酸奶 (可以用原味酸奶取代)
1 粒 鸡蛋
270克 高筋面粉
30克 低筋面粉
20克 有机原糖 (可以用幼糖取代)
1/8 小匙 盐
1/2小匙 即发干酵母
30克 橄榄油
350克 红豆沙 (广祥泰买的)
Method 做法:

1. Place all ingredients based on the sequence listed above (except olive oil) into the breadmaker pan. (Note: Place sugar on the left side and salt on the right side. Make an indention at the centre of the flour and add instant yeast, make sure it does not touch the wet ingredients below.
1。根据上面列出,将所有配料(橄榄油除外)放进面包机盘里。(注:糖放左边,盐放在右边。把酵母粉放在面粉中间,确保不接触到下面湿的成分)
2. Select pasta program. (Kenwood BM250 - select program '9' , this cycle takes 14 minutes to complete.)
2。选择面食面团程序 (Kenwood BM250 - 选择程序 '9' ,这个过程只需14分钟就完成)。
*This extra step will help to improve the texture of breadmaker bread.
*多了这个步骤是为了让面包机做出来的面包更好吃。
3. At the end of program '9', select basic loaf program and add in the olive oil. (Kenwood BM250 - select program '1',750g loaf and light crust , this cycle takes 3 hrs and 18mins to complete.)
3。面团搅好了,再选择基本做法程序并加入橄榄油。( Kenwood BM250 - 选择程序 '1', 750克重,外皮浅色。这个过程需要3个小时,18分钟完成)。
4. After the first proofing, which is about two hours before the end of the program, take the dough out onto a lightly floured table. (For Kenwood BM 250, I removed at 2:07) Punch down, the dough may be a little sticky but avoid using too much flour when handling otherwise the bread will not be as soft. Remove the dough kneader at the same time.
4。程序结束前两小时,也是面包第一次发酵后,拿出面团放在撒上面粉的工作台。(这时也把内锅的叶片取出)面团有点粘手,不过不要用太多面粉。不然面包就不会那么松软了。
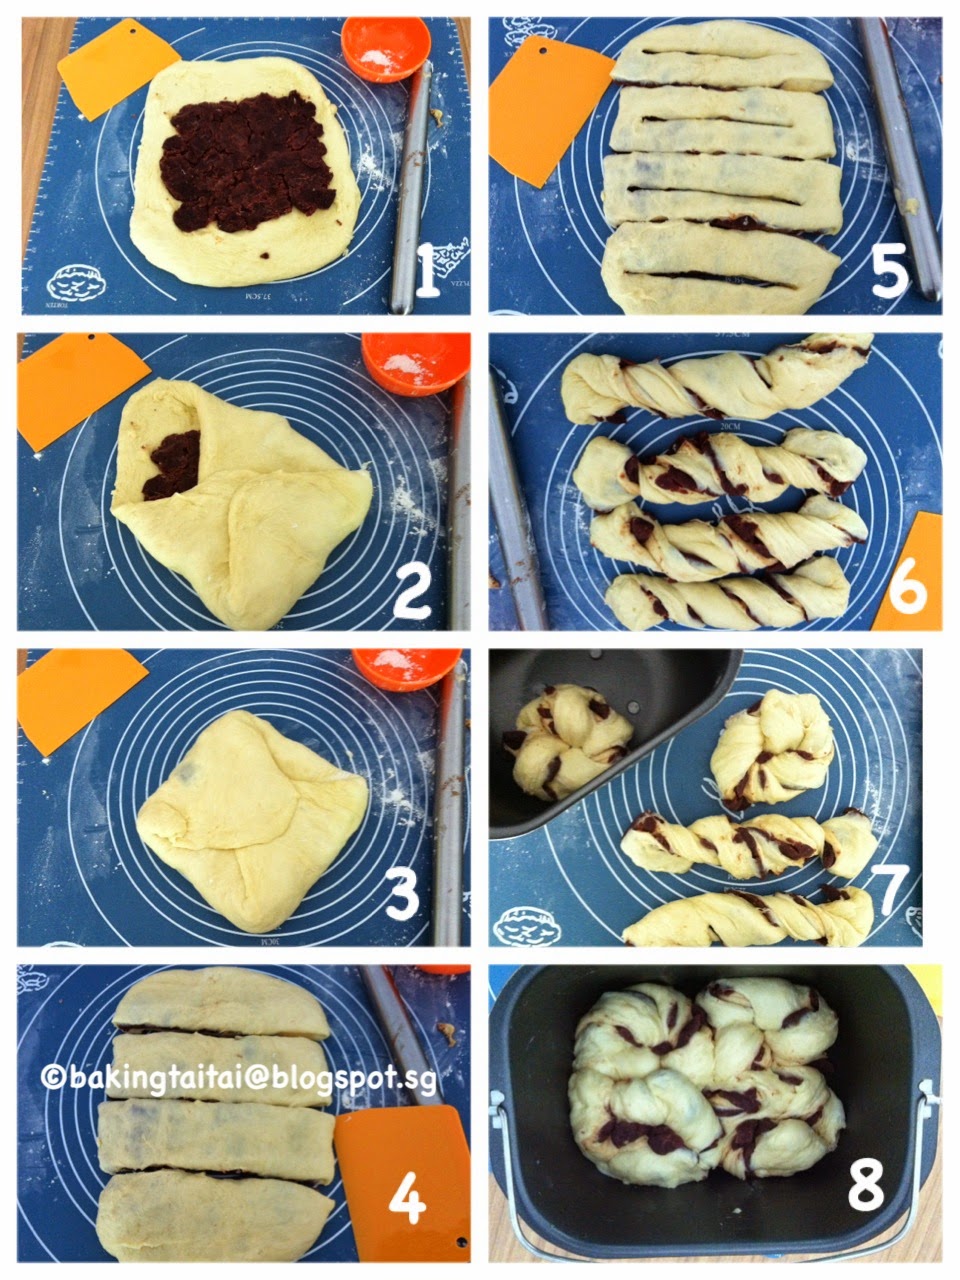
5. Following the photos, use a rolling pin to roll the dough into a square, spread the red bean paste on the dough (photo 1). Fold the 4 sides (photo 2), sealing the edges to prevent any air from entering (photo 3). Use the rolling pin to roll the wrapped dough out and cut into 4 equal pieces (photo 4). Slit open the centre of each piece (photo 5), twist the two ends of each piece in opposite directions (photo 6), form a circle and place in breadmaker (photos 7 & 8).
*Remember you will have to work fast and put the buns back into the breadmaker preferably within twenty minutes so that there is sufficient time for proofing before the breadmaker starts baking.
5。照着图片,用擀面棍擀成正方形面片,红豆沙放在面片中央 (照片1)。将面片四面折起 (照片2),包住红豆沙,收口处紧密捏合,不让空气跑出 (照片3)。用擀面棍擀宽面片, 切成四片(照片4)。分别在表皮中央画一刀 (照片5),反方向扭曲两端 (照片6),形成一个圆圈,并放置在面包机(照片7&8)。
*请尽量在20分钟内完成,这样才会有足够的时间让面包发酵。
6. Let the breadmaker do the rest of the job.
6。让面包机做剩余的工作。
Note 附注:
1) When the cycle completes, remove the bread immediately from the baking pan to prevent shrinking and sweating.
1) 当面包烤好时后,即刻取出面包,以防止收缩和出汗。
2) Cool it on a wire rack for about 30 mins before slicing.
2) 放在架子上冷却30分钟, 再切片。
3) Store in an air-tight container and consume within 2-3 days as homemade bread does not contain any preservatives.
3) 存放在一个不通风的盒子里,自制的面包不含有任何防腐剂, 请在2-3天内吃完。
© Copyright 2014 bakingtaitai.blogspot.sg
200克 希腊酸奶 (可以用原味酸奶取代)
1 粒 鸡蛋
270克 高筋面粉
30克 低筋面粉
20克 有机原糖 (可以用幼糖取代)
1/8 小匙 盐
1/2小匙 即发干酵母
30克 橄榄油
350克 红豆沙 (广祥泰买的)
Method 做法:
1. Place all ingredients based on the sequence listed above (except olive oil) into the breadmaker pan. (Note: Place sugar on the left side and salt on the right side. Make an indention at the centre of the flour and add instant yeast, make sure it does not touch the wet ingredients below.
1。根据上面列出,将所有配料(橄榄油除外)放进面包机盘里。(注:糖放左边,盐放在右边。把酵母粉放在面粉中间,确保不接触到下面湿的成分)
2. Select pasta program. (Kenwood BM250 - select program '9' , this cycle takes 14 minutes to complete.)
2。选择面食面团程序 (Kenwood BM250 - 选择程序 '9' ,这个过程只需14分钟就完成)。
*This extra step will help to improve the texture of breadmaker bread.
*多了这个步骤是为了让面包机做出来的面包更好吃。
3. At the end of program '9', select basic loaf program and add in the olive oil. (Kenwood BM250 - select program '1',750g loaf and light crust , this cycle takes 3 hrs and 18mins to complete.)
3。面团搅好了,再选择基本做法程序并加入橄榄油。( Kenwood BM250 - 选择程序 '1', 750克重,外皮浅色。这个过程需要3个小时,18分钟完成)。
4. After the first proofing, which is about two hours before the end of the program, take the dough out onto a lightly floured table. (For Kenwood BM 250, I removed at 2:07) Punch down, the dough may be a little sticky but avoid using too much flour when handling otherwise the bread will not be as soft. Remove the dough kneader at the same time.
4。程序结束前两小时,也是面包第一次发酵后,拿出面团放在撒上面粉的工作台。(这时也把内锅的叶片取出)面团有点粘手,不过不要用太多面粉。不然面包就不会那么松软了。
5. Following the photos, use a rolling pin to roll the dough into a square, spread the red bean paste on the dough (photo 1). Fold the 4 sides (photo 2), sealing the edges to prevent any air from entering (photo 3). Use the rolling pin to roll the wrapped dough out and cut into 4 equal pieces (photo 4). Slit open the centre of each piece (photo 5), twist the two ends of each piece in opposite directions (photo 6), form a circle and place in breadmaker (photos 7 & 8).
*Remember you will have to work fast and put the buns back into the breadmaker preferably within twenty minutes so that there is sufficient time for proofing before the breadmaker starts baking.
5。照着图片,用擀面棍擀成正方形面片,红豆沙放在面片中央 (照片1)。将面片四面折起 (照片2),包住红豆沙,收口处紧密捏合,不让空气跑出 (照片3)。用擀面棍擀宽面片, 切成四片(照片4)。分别在表皮中央画一刀 (照片5),反方向扭曲两端 (照片6),形成一个圆圈,并放置在面包机(照片7&8)。
*请尽量在20分钟内完成,这样才会有足够的时间让面包发酵。
6. Let the breadmaker do the rest of the job.
6。让面包机做剩余的工作。
Note 附注:
1) When the cycle completes, remove the bread immediately from the baking pan to prevent shrinking and sweating.
1) 当面包烤好时后,即刻取出面包,以防止收缩和出汗。
2) Cool it on a wire rack for about 30 mins before slicing.
2) 放在架子上冷却30分钟, 再切片。
3) Store in an air-tight container and consume within 2-3 days as homemade bread does not contain any preservatives.
3) 存放在一个不通风的盒子里,自制的面包不含有任何防腐剂, 请在2-3天内吃完。
 |
I am submitting this to International Yeasted Recipe hosted by Kristy of My Little Space.
“It takes time and effort to compose or translate recipes, I would appreciate it if you do not copy and pass it off as your own recipe. If you wish to share or adapt any of the recipes that I have posted in this blog, please provide a link back to the relevant post here. Thank you.”
"编写或翻译食谱需要时间和精力的,请不要复制或将它作为自己的
© Copyright 2014 bakingtaitai.blogspot.sg
14 comments :
Hi Cheryl, thanks again for another beautiful submission. Keep on the good work & have a fabulous week ahead.
Blessings, Kristy
Hi Kristy, thanks and wishing you a blessed week too! :)
Hi Cheryl,
May I know under what circumstances will you use cake flour and wheat flout and top flour? Saw some of the recipes uses different flour. Thks so much!
Hi Karen,
Bread flour, cake flour and top flour are all wheat flour which has different gluten content. For bread making, one should use bread flour which has a high gluten content, around 13 to 14%. Cake flour (7 to 9%) and top flour (9 tp 10%) has a lower gluten content and a small portion of it is used in bread making to help to achieve a softer texture. If I run out of cake flour, I will replaced with top flour to achieve a softer bread dough. Hope this helps. :)
Hi Cheryl,
I tried this recipe (excluded red bean paste) & simply loves the texture. However, my husband find the smell of olive oil too strong so would like to check if I can replace with butter?
Hi Phyllis, thanks for trying out the recipe and yes you can replace the olive oil with butter. :)
Hi Cheryl,
May I check, if I were to use a normal oven to bake the bread (instead of the breadmaker in your recipe), at what temperature and how long should I bake the bread for?
Thank you (:
Hi +Ji@LiN,
If you are using a pullman tin with lid, bake it at 200 degree celcius for 40~45 minutes.
If you are using a loaf pan, bake it at 170 degree celcius for 35~40 minutes.
These are suggested temperature and timing. After trying out, you should adjust accordingly to suit your oven. :)
Hi Cheryl
Thanks for sharing such lovely recipes.
How do you keep your dough from sticking to your rolling pin, table and hands? From your pics, it seems so clean and easy.
I tried dusting the table with some cake flour before spreading the dough but it still sticks to my rolling pin and hands.
Thanks!
Hi, (can't address you as you did not state your name)
This dough is manageable and does not really sticks on hands. I dust the rolling pin with some bread flour and the use of silicon rolling mat may have help too as the dough does not stick to it. Alternatively, you can oil your hand and rolling pin with some olive oil to prevent the sticking problem.
Thanks Cheryl!
When can I get a silicon rolling mat? Phoon Huat?
From Audrey
Hi Audrey, my silicon rolling mat was bought from overseas. I think you should be able to find similar silicon pastry mat at Kitchen Capers, the pastry mat (Silpat) sold at Phoon Huat is a premium brand of very good quality and cost much more but it is good to invest in it as you can also use it as a baking sheet and put it into the oven to bake.
Hi Cheryl,
I've been reading all your lovely breadmaker recipes and am tempted to get a small breadmaker. I was wondering if your loaves are a certain size/weight as I read online that the Kenwood BM250 can make 500g, 750g and 1kg loaves. I am planning to get a small Zojirushi that makes only 450g loaves - is it possible for me to still use your recipes, but maybe divide them by a certain amount? Thanks in advance!
Hi Jess, my breadmaker recipes are for 750g loaf, yes you can still use my recipe for Zojirushi breadmaker, just divide accordingly when making 450g loaf will do. :)
Post a Comment